Monthly Archives: September 2012

Free Day Friday!

Standard

It is Free Day Friday. And I am running short on time today. So, I just thought I would share this little view. The picture came from Pinterest, and it links ONLY to the picture. I am  happy to credit the original owner of the picture, if anyone can tell me who it is!

Our dream house will be built on a flat farm, about 25 miles from the coast. There is no chance of us ever building something like this… even if we could afford it. So, instead, I will just drool over this one!

Dream on friends.

J.

Thinking About Christmas

Standard

I know! I know! It is still September! Though, in fairness, it is almost October. And, to be honest, around the first of July, I start thinking of Christmas. It dawns on me around that point that we are officially closer to the next Christmas, than the previous one. That is an exciting time for me! I love Christmas. I love what it stands for. I love the music. I love the lights. I love the presents. Getting them is great, but I LOVE finding, or making, the perfect gift for someone. I love that our family figures out how to get together and celebrate, even if we have to do it in shifts, because it is the In-Law’s year to have Christmas day. I love decorations. I love decorating. The only thing I don’t love about Christmas is having to take it all down!

A few years ago, when B was preparing to retire from the Air Force, we were planning to move to NC to build our dream house on the family farm. While we waited for that to happen, we were going to live with my parents. Part of that was that we were going to have to get rid of a lot of our extraneous stuff. In the end, we did not move. We realized just how bad the housing market was, and we decided to stay put for a few more years. However, in that preparation, one of the sacrifices made was about 1/2 of my Christmas decorations. Because, honestly, if I was going to be living with my parents for a few years, I could certainly merge my decorations with theirs, and get rid of a lot of the duplicates. I sold or gave away a ton of stuff. You know those giant plastic bins? I emptied 3 of those! Aghghg!!!

However, last year, I started rebuilding the stash. I started with lights. Lots of lights. Because I am not kidding when I say that last year, the tree had wads of lights, that did not work, shoved in the back, because I did not have enough complete working strands. We were broke, and B was not down with spending money of Christmas decorations.  This year, there will be working lights.

This year will also see participation from B. He is typically not into Christmas. Sure, he likes opening gifts, but that is about it. He has no use for the songs, or the decorations, or the shopping. However, last year, we struck a deal, and I held up my end. So, his end was that he would start participating in Christmas.  I feel certain that if he will just participate, he will have fun!

Thanks to Pinterest, here are some of the things I have on the brain to make or decorate with.


From A Diamond In The Stuff.

I am not sure either of my dogs would sit for this, but it would be so cute for a Christmas card!                                 This picture is  from Natural Pet Shampoo on Etsy.


I want these iced branches all over my house!

Thanks to Make Them Wonder for showing us how to make them!

I am looking forward to spending a couple of days making my house all warm and cheery this Christmas. And, I will probably take them down  before spring!

Happy Christmas planning!

J.

Want It Wednesday Step Stool!

Standard

I am short. I suppose, not painfully so. On a really good day, with shoes, I am 5’5″. Most days, in my flip-flops, I am a bit closer to 5’4″. I have one step stool in my house, and it gets carried to every room. The obvious answer is to get more stools. Or grow. But, seeing as I was 5’4″ in the 5th grade, I don’t see the growing happening any more. So, as I stand, I can not reach the top shelves anywhere in my house. Enter my dream step stool, available here.

I want this stool in my kitchen!

You remember these? From the library? You could kick it to wherever you need it? But then when you stand on it, it locks down. No movement. I want this stool!  I is going to be on my Christmas list. Feel free to buy it for me! 🙂

Keep Dreaming Friends!

J.

Ten Things Tuesday- Things I Love in My Craft Room!

Standard

For my first installment of Ten Things Tuesday, I bring you 10 craft supplies that I love. Something you should know about me, I use what I have on hand. When I have some money to spare in my craft budget, I go out and buy some things. However, when times are tight, the craft budget is among the first to suffer. So, I make do with what I have.


My 10 favorite things in my craft room, in no particular order.

  1. My Computer.  For the first time in almost 10 years, I have a desktop computer. Don’t get me wrong. I LOVED my laptops. However, I dropped a bowl of milk (post cereal) on the last one. And, well, the computer just did not like all of the milk fat and cereal sugar up in all of its parts! So, we raided my cash stash, which we had been saving for something else, and purchased the most computer that the $400 could buy. And, when it comes right down to it, $400 buys a lot more desktop than laptop. So, here I sit, with a desktop computer. I have discovered that I rather like having the keyboard again! And the USB ports! Without adapters, I can plug anything I want into my computer!
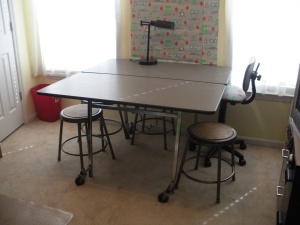
  2. My craft table.  I was using a drafting table for crafts, but I also had 3 kids trying to do art projects and homework around it. I desperately needed a bigger table. So, I grabbed my Bestie, and headed off to a school auction. I could easily catch the auction bug. It was my second trip to a local auction. I loved it. I got this table. It is 4×4 feet, and folds up practically flat to the wall to make floor space. The best part? I paid less than $25!

    Folding Table

    Old school cafeteria table became my new craft table!

  3. My TV. I have this completely old TV. It is a Sanyo, and I rescued it when my parents sold their beach condo. It serves a decent purpose, in that I can watch craft / home shows while I work. Or, I can just have something mindless on in the background!
  4. My Dremel. That little tool has drilled more holes and buffed more pieces than I care to think of! I love it!
  5. Sewing Machine. I am a crappy sewer. I would love to learn to sew, but classes are just not in the budget right now. One day, I will learn. In the mean time, I sew very basic things. I have hemmed pants and curtains. I have made a couple of basic tote bags and purses, and a bunch of little plush monsters and dolls. Most are ugly, but I love that I am finally able to travel down a road to making some different things.
  6. Nail scissors. Yes. Nail scissors. I have probably spent hundreds of dollars on scissors over the years. Especially when you consider all of the ones I purchased when I thought I was going to scrapbook our wedding and honeymoon. For the record I did one page, and wanted to pull my hair out! I might have been a stress case back then!! Ha! But, I digress. Nail scissors. They cut itty bitty precise little cuts. Try them. You will love them! Dollar store nail scissors work great for me!
  7. Binder clips. Bulldog clips. Whatever you call them. I use them everywhere. I use them to bind things, hold glued things together, hang things, I even use them as picture holders!
  8. Fabric stash. Like I said, I do little sewing. But I use fabric in so many crafts. And, frankly, I just think the colors are pretty and inspirational, sitting there on the shelf!
  9. My wand. I have a wand, inspired by that magical school we all know and love so well. When I am having brain block, I pick it up, and wave it around. It helps me remember that imagination has gotten people past their worst blocks. And frankly, sometimes, it is fun to pretend like one of those spells could actually happen!
  10. Label Maker. Because, seriously, who doesn’t like to label our stuff?????

What are your favorite things in your craft space???


Craft on!

J.

Hanging File Folders on Made It Monday

Standard

Like so many other people, I am perpetually on a search for a way to keep my life organized.  When I saw this project at The Silver Lining I thought I could tweak it for myself.

So, I set off to try it myself. Aren’t you lucky!!!??!!  I even took pictures along the way! First, I gathered materials. Well, I gathered everything I thought I would need, and almost every material changed throughout the process!

I used:

5 File Folders

4 pieces of scrapbook paper

White Glue

Hot Glue

Ribbon

Duct tape

A Curtain Ring

I started by cutting the tabs off of the folders. To be perfectly honest, it would be more than OK to leave them on there. I was having a OCD moment, and the staggered tabs were driving me nuts! I did keep the center tab on one folder, for hanging.


I Measured 4 inches down from the cut edge (on the inside of the folder) on each folder. And drew a line.  From that line up is where each folder was glued to the next.


I traced the outline of the tab onto a piece of scrapbook paper, cut it out, and glued it to the top folder.
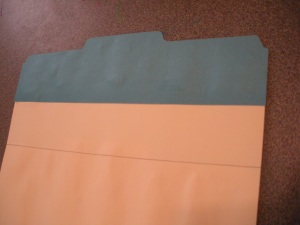
 

Now, I began gluing the folders together. Each folder is nested into the one below it. So, the lower half of the back of folder 1 is glued to the upper half of the inside back of the next folder. Once the folders are covered in paper, the nesting is a little easier to see in my pictures!


Once all of the folders were glued together, and dried, I flipped the whole thing over, and added a strip of duct tape at each folder, for some added strength. Let’s be honest, those folders are not going to budge now!!!
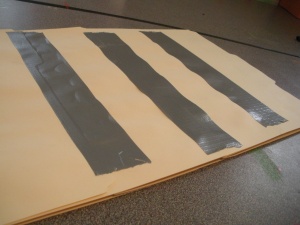


Using alternating papers, I then covered the fronts of the folders. Since I removed the tabs, the alternating papers made it obvious where the openings were. This picture shows the nesting a little better!


On the bottom folder, I papered around the bottom for a cleaner look.


I am not sure that I love the purple, but I had it on hand, and I did not want to spend money on this project! I hot glued the ribbon down the sides, folding it over, to close the folders. I folded the ends of the ribbon over and glued them down.


I clipped a drapery ring to the top tab, and hung my folders on a hook.


With the sides closed, you obviously can not put a lot of paper in each folder. This is fine for me. Mine currently holds my jump off lists. My jump off lists are starters. The things that I start every list with. The grocery jump off has about 50 things on it! I have to drive a little ways to get to my commissary. So, I buy about 6 weeks worth of food at one time. We fill in basics and fresh foods at a store closer to us.  I add to the jump off list as I think (or plan for) other things I want.  I have 5 jump off lists, and will share them in a later blog.


*********************

*********************

What would I change? I would have duct taped the sides before adding the ribbon. When my budget allows for purchasing more craft items, I will probably put a grommet in the top, so I can put the drapery ring back into the curtain bin! However, for now, I already had those!


Happy Crafting!

J.

Funny Picture Friday

Standard

Following this new plan of blogging daily, and my little  theme nudge in a direction, we are on Free Day Friday. Free Day Friday will feature a product that I am in freaking out about  in love with, a funny picture, or some fun tidbit that I have come across.  So, for today…

___________________________________________________________________________________________

Funny Picture!

What are we looking for?

There was a time in my life when I rode horses.  At some point in my future, I would like for that to happen again.  First, we need to get out of this house, and move to the farm.

These ponies, with their heads buried, remind me of the horse I had when I was a teenager. His name was Big Gee, and he would eat anything! 

Happy Friday everyone!

J.

Thinking About… Books!

Standard

It is Thursday. Time to think about my blog. Well, I say that because, I have been working on some projects and ideas for my blog. I have come up with a vague theme for each day, and am going to work hard to stick to it.

So, without further ado, here you go.

_________________________________________________________________________________________


I have been thinking about books. Recently, I have been rereading a couple of series.

I have just finished rereading Harry Potter. Before that, I reread my Kitty Series. Kitty is a werewolf, who just finds herself in a bit of trouble. The books are light hearted, with just enough mystery. I just read Finger Lickin’ Fifteen by Janet Evanovitch.  I believe there are currently 18 in the series, but, I am waiting for copies of the rest to resurface at the library.

The rereading her mostly happened because I finished the last book that I had in my pile, and my local library did not have anything that was ringing my bell. So, what I need is some recommendations.

I like easy to read books. I like mysteries, comedies, and some romance. I also like books that have a little bit of the supernatural.

If you have read a book lately that you love, or that you would recommend, please feel free to let share!

Thank you!

J.


Sticking With the Owl Theme

Standard

While my nieces were here for a week, we were burdened with some bad weather, and spent a lot of our time crafting. They went home with a gallery (literally, they created a gallery to tour their parents through) of projects.  Some I did with them, others I just helped them with.

One of the ones I did was this owl. We purchased $3 picture frames, and painted on the glass. We used acrylic paint. We printed drawings that we liked, and taped them to the frame. The hardest part of this project is making sure that you paint things in the right order. Think of it like layers of color, making sure that you paint the outlines and details first, then do the backgrounds and bigger spaces later.

If I had better color walls in my house, I would have left the glass clear, and let the wall be the back drop. However, we have very dull color walls, and my owl looked bad in front of all of them!  So, I painted it blue, and hung my owl in front of my owl fabric on the wall.


So, enjoy. 🙂

If you have questions, I can try to answer them!

Craft on!

J.


New Owls

Standard

I have said it before. I do not generally jump all over trendy things. But I just can not let go of these totally cute little owls. I love them! I have them all over my craft room. On the walls, the chair, and in multiple art projects.

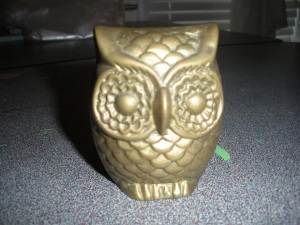
Today, I am sharing my (formerly) ugly brass owls.

I got 2 of these guys at a thrift store for 50 cents each!


I cleaned them up with some soap and water, and picked out my pink and turquoise acrylic paints.  I pretty much just got going.  I started with paint strokes, but discovered quickly that a pounce was way better on the brass.


The turquoise looked really good pretty quickly. The pink was just too light for the brass, without some kind of primer, which, I did not have.


So, I mixed some red in, to get a darker pink. In the end, it took 2 coats of turquoise and 4 coats of pink. I did 3 layers of spray acrylic sealer. And put those babies on the shelf!  I love them!!!


Next time, I will remember to take a true “after” picture, without all of the paint paraphernalia in the picture!


Happy Crafting!

J.